Making an
animation fit your tag
Now the little more challenging one – actually it’s more time
consuming – but once you know how to do it – you will do it often!!!!
I find I use this one the most with snow animation – I have
collected several different ‘snows’ and each one is a different size and or
shape and practically none of them fit exactly on my tags.
First we need to get our supplies – I suggest you use the same
as me just for this tut – so that we are working with the same size of things.
Snow Animation – we will be working with this set from Simone
- http://scrappybitoffun.blogspot.com/2012/10/animation-set-166-170.html
Scrap Kit – Blue Ice by MizTuquees (4th row
– far right) - http://mizteeques.blogspot.co.uk/p/scrapkits.html
Please respect these artists kindness of sharing their work
for free by reading and abiding by their TOU and also when you have some time
look around each site and enjoy all the goodies!!!
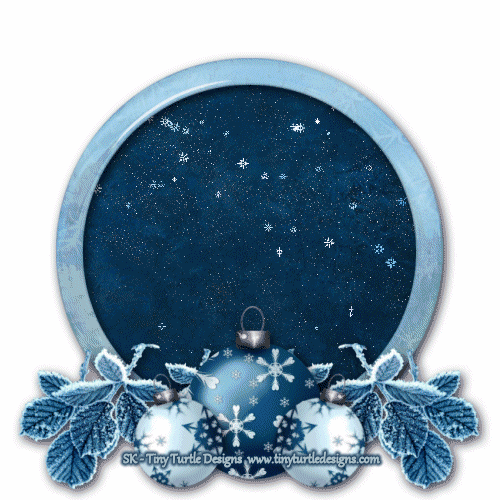
Let’s start in PSP – we are going to make a very basic tag
Open a new image 650 x 650 transparent
Copy and paste element 20 – resize 70% - all layers unchecked
With your magic wand – feather set to 2 – click inside the
middle of the frame – expand by 10.
Open paper 6 – copy and paste as a new layer –
invert – hit the delete key – deselect and move below the frame
Below are the elements and what to resize them to:
60 – 40% - move to right hand side – duplicate and mirror
9 – 35% - place in center
8 -
25% - rotate left 16 – duplicate and mirror
You can add drop shadow of choice – and remember to add a
white layer and send it to the bottom.
Let’s resize our tag to 500 x 500 – all layers checked
This is what you should have

Activate your paper background layer – copy – paste as a new
image – we will be working on this layer for now.
Open the snow animation folder and select Simone Ani-167 PSD
file – duplicate and minimize the original.
As you can see it’s much larger than our tag. So we need to make it fit!!!
Activate the background circle – copy and paste as a new layer
on the animation layers.
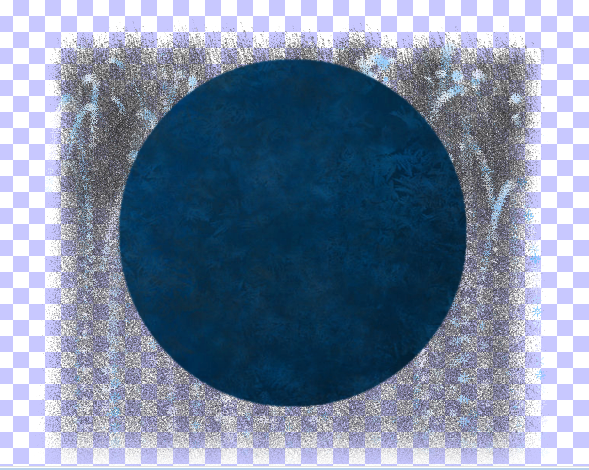
Staying on this layer – SELECT ALL – FLOAT – DEFLOAT – INVERT.
Click on each animation layer (one at a time) and hit the
delete key.
When completed you should no longer see any snowflakes. Deselect.
X-out your paper layer and scroll down to frame 1
We need to make our new animation !!!!
Copy frame 1 – in A/S – paste as a new animation
Back in PSP – copy frame 2 – in A/S – paste AFTER current
frame
Continue until all 36 frames have been moved.
When you are done – you should have 36 frames in A/S
Back to PSP – merge your background paper down with the white
layer. Copy and Paste as a New Animation in A/S
We need 30 frames – of our circle background – go to EDIT –
DUPLICATE SELECTED – keep clicking this – watching the number on the bottom of
the image til you get 30 or more – if you get more –
just go to the last frame – click on it – hit delete – keep moving along doing
this til you have 36 frames. When I got to 33 frames – I went back to the
beginning – and holding down the shift key – I clicked on frames 1, 2, 3, then went to EDIT –
DUPLICATE SELECTED and got my exact 36 frames
Once you have your 36 – slide across to the beginning or Frame
1 – click on it – then EDIT – SELECT ALL
Now click on our new animation – make sure you are on the
first frame – click it – then EDIT – SELECT ALL – COPY
Make sure your PROPOGATE PASTE button is clicked.
Now – Move your mouse over to your circle background – and you
should see your animation.
Position so that it is on the dark background – it’s ok if a
few of the flakes are on the white – they will be covered by the frame. Once you have it where you want it – left
click your mouse button.
Now run the animation to see how it looks – if you are not
happy with it – close that window and click the undo button and try again –
your snow should still be loaded in your mouse.
Remember to close the window that opens when you test to see how it
looks – we don’t need that yet – we have a few more steps.
Back in PSP – activate your original tag – X-out the
background/white layer – click on any other layer and merge visible.
Copy – over in PSP – paste as a new animation. Now copy it again.
Activate your blue circle animation image – make sure all the
layers are selected and propagate paste button is active – and position over
your blue circle. Remember if you don’t
like the way it looks – just click undo and try again. Once you are happy – SAVE!!!
You may want to run and save the snow circle animation you
made also – I keep all of mine – never know when it might fit in another tag
and save me having to do all the work again!!!!